Tech Tips
A variety of Technical Diagrams, Articles and Technical Tips. The Technical Tips first appeared in the 1942 Issue of "Motor Magazine." Some of them have been updated from tips found in the PC Forum. The diagrams and articles are from other sources.
Diagrams
Tech Tips
- Engine won't start or starts hard
- Engine misses in one cylinder when idling
- Engine misses, No particular cylinder when idling or Operating below 20mph with no load
- Engine misses at high speed
- Engine misses at all speeds
- Poor high speed performance or Lack of power
- Loss of engine compression
- Engine backfires through the carburetor
- Pre-ignition or spark knock
- Excessive Oil Consumption
- Low oil pressure
- High oil pressure
- Engine oil filter inoperative
- Crankshaft noise
- Connecting rod noise
- Piston or piston pin noise
- Valve or valve lifter noise
- Engine vibration at idle
- Engine vibration especially at high speed
- Engine noises due to other conditions
- Oil pump & distributor shaft noise
- Excessive fuel consumption
- Manifold leaks
- Fuel delivery insufficient
- Fuel pump noise
- Ignition troubles
- Starter not operating properly or inoperative
- Starter drive noises
- Generator not charging properly or inoperative
- Generator noises
- Frequent battery charging necessary
- Faulty headlamp action
- Excessive engine temperature
- Water pump noise
- Fan & fan belt noise
- Early fan belt failure
- Noises due to other conditions
- Convert or not to convert to 12volt
- 12v - ground Accessory in 12v + ground Packard
- 'Old Timer' Compression Test
Diagrams
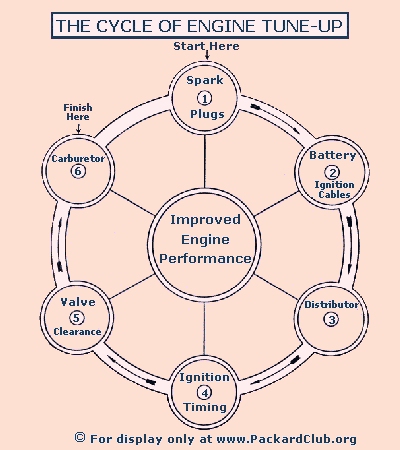
Tune-up Cycle
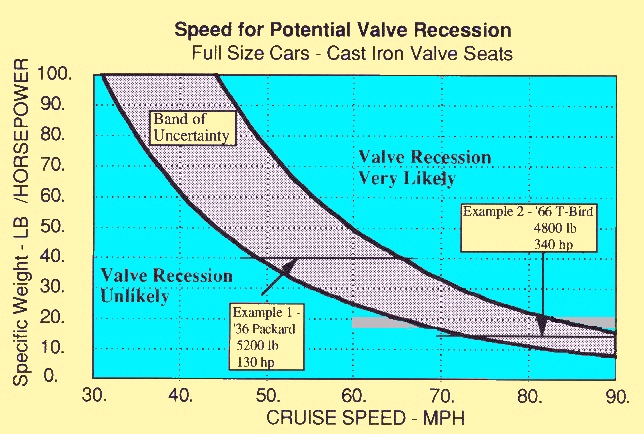
Valve Recession
Valve Adjustment
HERE GOES: The job itself is not difficult. All you need is time, much time, especially when you do this job for the first time. Use a sponge to wipe the sweat from your face.
Use a car jack to make the job easier. Remove the right front wheel. Then you remove the big sheet metal plate you see on the inside. There are about 9 or 10 screws (hex). Now you look right into the engine compartment. It is recommended that you also remove the (mechanic) fuel pump, just two bolts, and the fuel line to the carb for easy access. This is very easy. Now there is more room to remove the valve cover, remove persistent, stuck pieces of the old gasket. Clean everything thoroughly and put on a liquid gasket film when you install a new valve cover gasket later on.
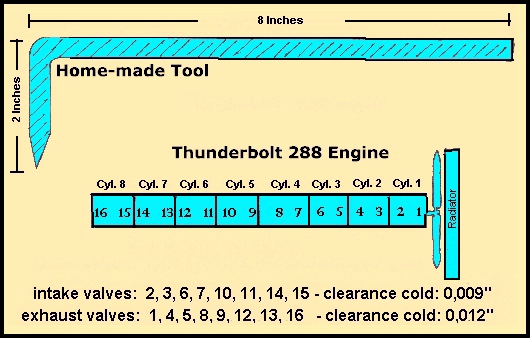
Loosen the two bolts in the middle of the valve cover. If the valve cover doesn't come loose, ugly words won't work nor will screwdrivers and other sharp devices. You can make your own tool. Do so before you start. It isn't hard to make. You need a steel bar (diameter at least 1/3 inch) of about 10 inches long. Bend (make it red hot) it in an angle of 90 degrees. [ See the drawing above for the measurements. ] Sharpen the short end razor sharp. Now you can use this tool like a lever, the sharp side behind valve cover. Pull very carefully, along ALL of the bottom edge of the cover (from the right to the left and back again) until the cover comes a little loose. Be careful you don't bend the cover.
Now you can see the valve gear. The only thing you have to do is to adjust the clearance is: take two 1/2" c-spanners. Between the valve stem and the valve lifter you see a 1/2" nut. Put on 1/2" spanner. Right below you can see that the valve lifter has 2 flat sides. Here put on the other 1/2" spanner. Now pull or push the two spanners with respect to each other. The nut and lifter can be very fixed, so much force can be necessary The longer the spanners, the more force you can perform, the easier you can turn the nut/lifter. Turning one way is increasing the clearance and the other way decreasing the clearance. Just try. Wrong turn?? No problem. Turn the other way. The clearance gap is right above the nut.
- Clearance: cold engine (from a retired Packard mechanic in New York, See drawing above)
- intake: 0,009"
- exhaust: 0,012"
- intake valves for the 4 front cylinders: 2, 3, 6, 7.
- exhaust valves for the 4 front cylinders: 1, 4, 5, 8.
- For the other 4 cylinders (5 - 8) it works the same way. So: cyl. 5 = cyl. 1; cyl.6 = cyl.2
- valve 9 = valve 1
- valve 11 = valve 3
- valve 10 = valve 2
- valve 12 = valve 4
- Adjust inlet valve when exhaust valve of the same cylinder is closed.
- Adjust exhaust valve when intake valve of the same cylinder is closed.
- Turn the crankshaft pulley nut with an appropriate key in order to turn the engine and adjust the next valve.
Articles
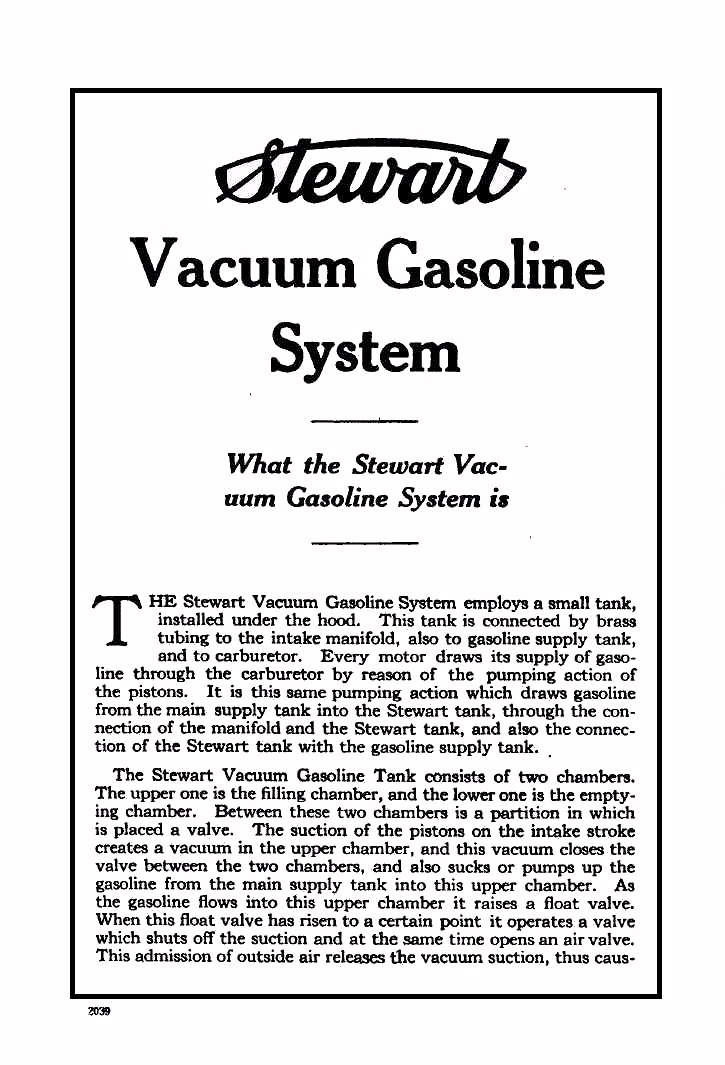
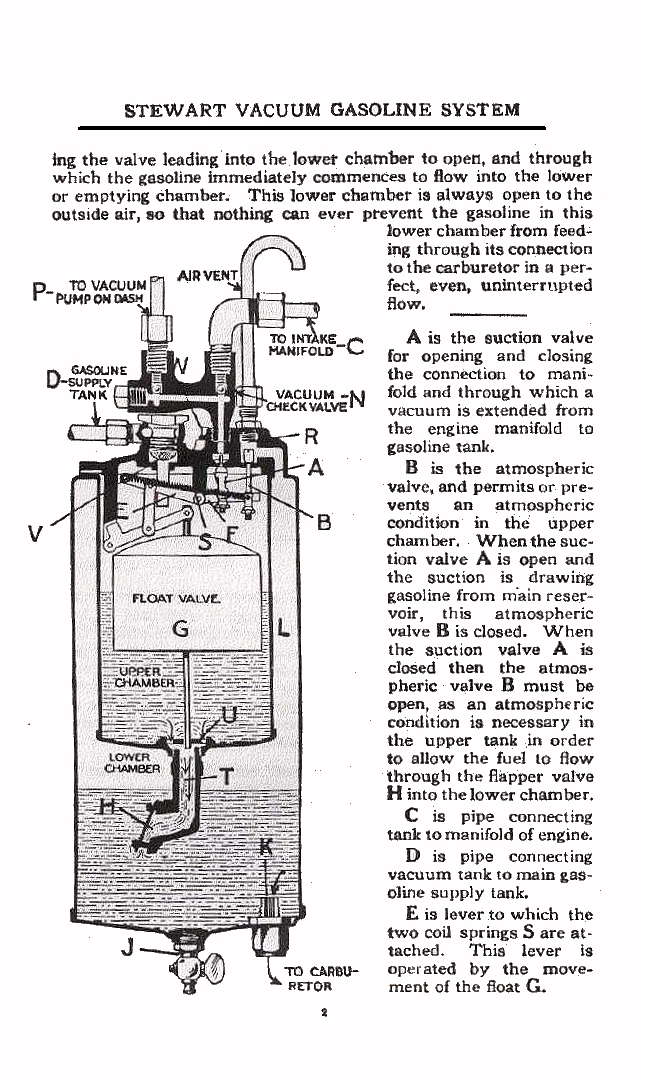
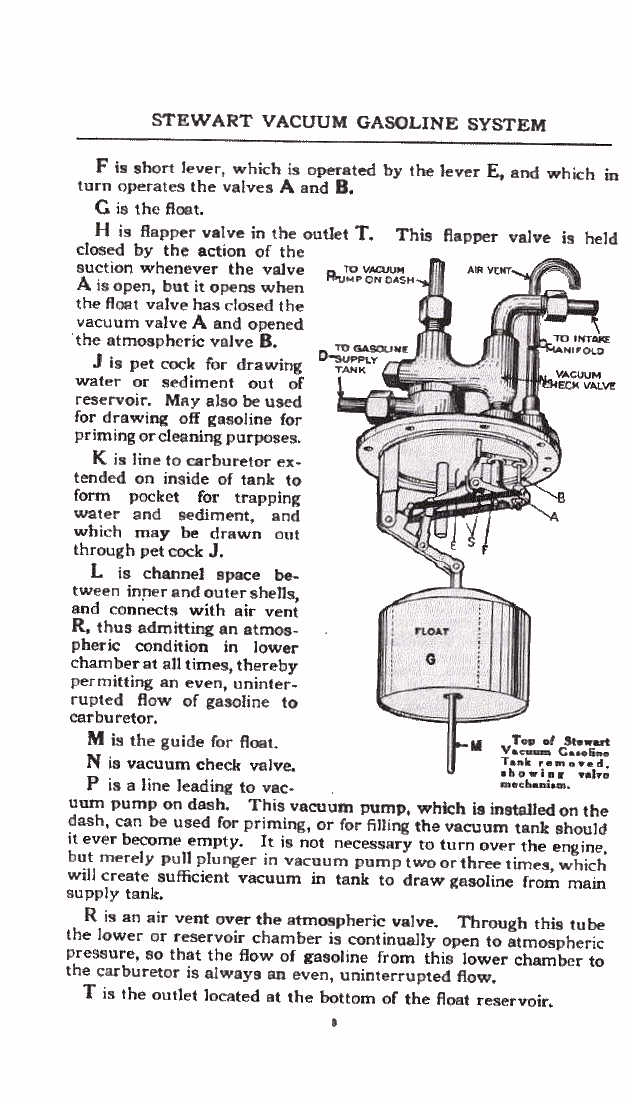
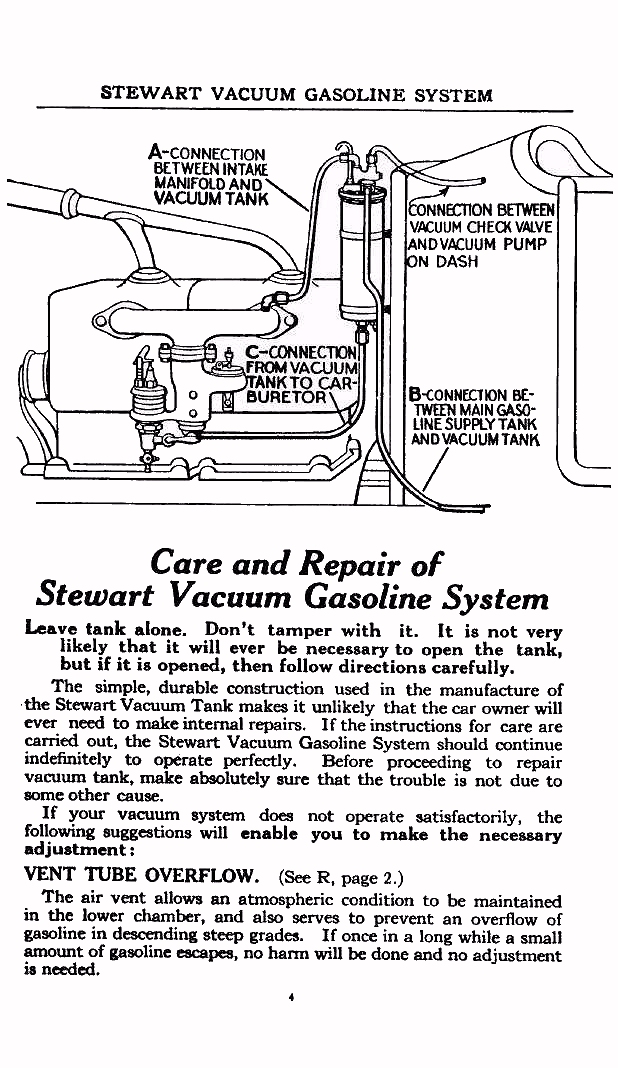
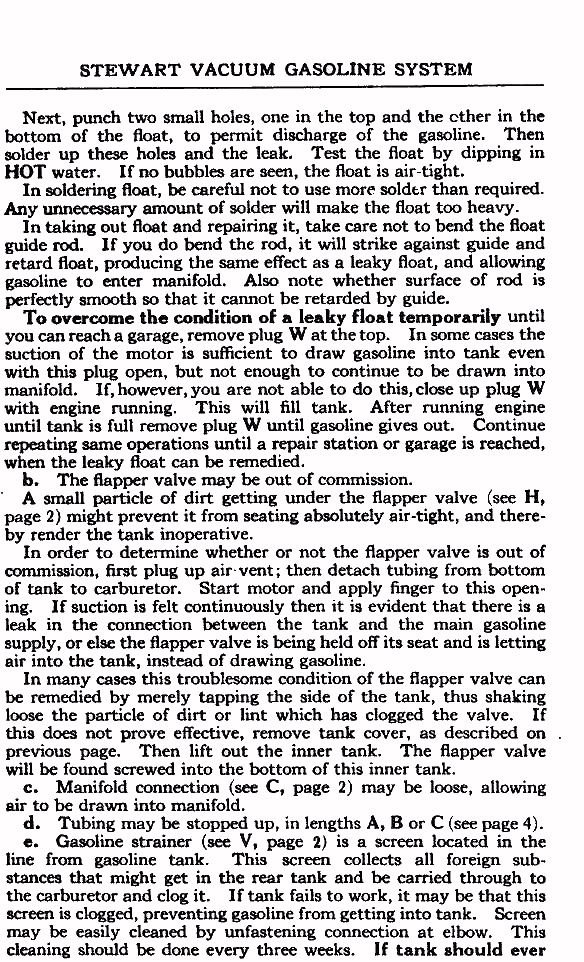
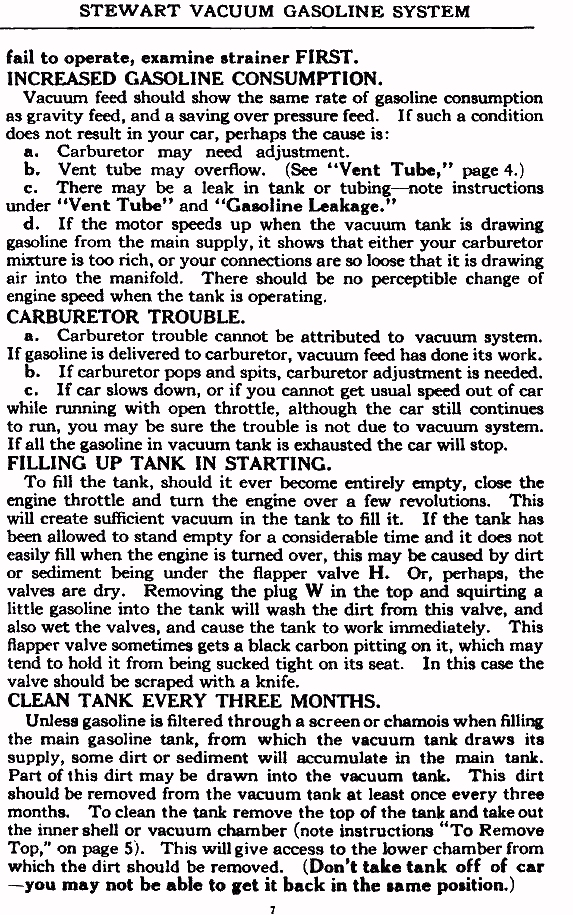
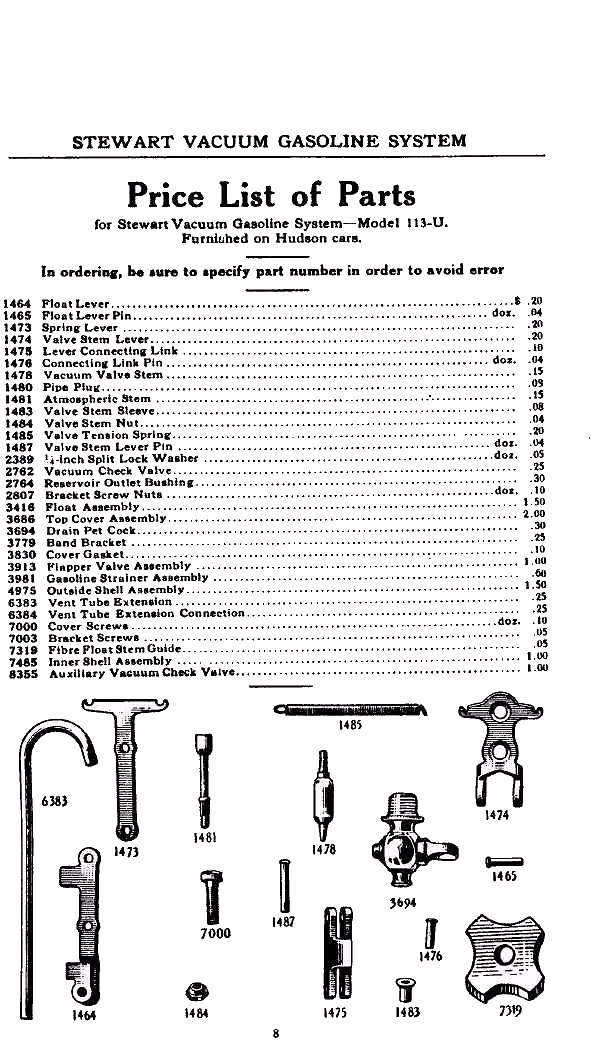
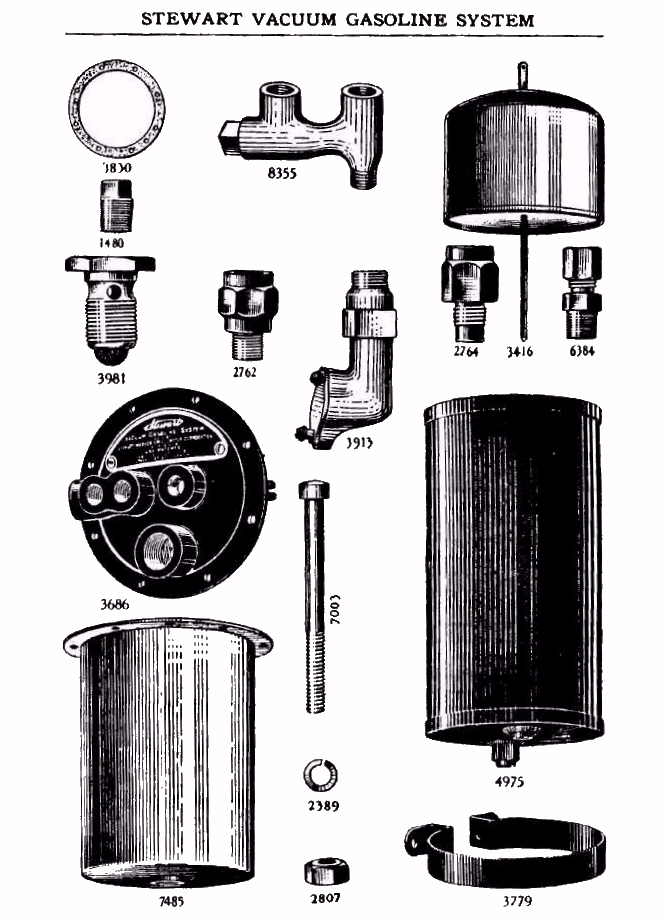
Stewart Vacuum Gasoline System
Electric Fuel Pumps
ELECTRIC FUEL PUMPS, DO IT RIGHT OR DON'T DO IT AT ALL
by Jim Dougherty
Installing an electric fuel pump correctly isn't difficult and will add pleasure and confidence to your Classic motoring. Installing one incorrectly can spark all kinds of neighborhood excitement, including a nasty fire, or if you are among the lucky, just a crank-case full of gasoline rather than the more conventional motor oil.
Note: Refer to Diagram 1 as you read this.
A correctly installed electric fuel pump will assist you by (1) Priming the carburetor after the vehicle has been unused for some time. This avoids undue wear and discharge of the battery because of excess cranking which would be otherwise necessary while the motor mounted pump filled the carburetor bowl via the cranking action of the starter. (2) Provide you a "back up" fuel pump should the original pump fail. (3) Assist in avoiding that nasty element of summer motoring usually described as vapor lock.
THE WRONG WAY
Unfortunately, the wrong way to install an electric fuel pump is also the easiest. This wrong way takes the form of cutting the fuel line between the fuel tank and the original motor mounted pump and installing the electric fuel pump at this point. Frequently the mistake is compounded by wiring this electric fuel pump so that it is always "on" when the ignition is turned on. This "in line" position will assist in easy starting after the vehicle has been unused for a while and may assist in the elimination of vapor lock. HOWEVER, it also virtually guarantees a crankcase full of raw gasoline should the fabric diaphragm of the original pump leak or rupture. One of the bad points about this is that you may see no exterior leakage since gasoline will be escaping directly through the perforated diaphragm into the crankcase and your first clue will be learning that your crankcase oil level is rising like a river in Fort Wayne. Continued running of the motor with a heavy concentration of gasoline in the motor oil can readily ruin bearings and other critically lubricated parts.
If part of the gasoline from the defective fuel pump leaks externally you have the added potential excitement of a fire. Either end result spells trouble that can and should be avoided by installing the electric fuel pump correctly in the first place.
THE SEAGRAVE WAY
Seagrave Fire Apparatus, who used the Pierce-Arrow V-12 and the Pierce-Arrow straight eight in their fire apparatus between the early 1940's on through the 1960's, had a very simple solution. As you note their solution keep in mind that Seagrave has probably built more "pierce-Arrow" V-12 motors than did the Pierce-Arrow factory. The Pierce-Arrow V-12 units were built in Buffalo from 1932 until 1938, six years, some of which near the end were quite marginal in volume. Seagrave pumped out their version of the Pierce-Arrow V-12 for over twenty--five years. These power plants were used in everything from the small rescue squads on through the giant tractor-trailer aerial units. They were literally used in most of the major countries throughout the world. Not only did Seagrave have a plant in Columbus, Ohio but also had an assembly plant in Canada. The last of the Seagrave units powered by V-12's were built in the 1960's and many of these are still in service, both first line and reserve status. This is intended to help make the reader aware that Seagrave was faced with similar problems to yours as a Classic owner and their answer over the many years has been a simple one that will work equally well for you.
THE SEAGRAVE WAY AND THE RIGHT WAY ARE ONE AND THE SAME
Seagrave split the fuel line between the fuel tank and the motor mounted fuel pump and inserted a "T" fitting. This "T" fitting leads to the inlet side of the electric fuel pump. A second fuel line, parallel to the original line, lead from the discharge side of the electric fuel pump to a second "T" screwed into the discharge side of the motor mounted fuel pump. Most apparatus had the electric fuel pump permanently wired into the ignition system so that the pump was automatically activated whenever the ignition switch was turned on.
WHAT'S SO GREAT ABOUT THIS METHOD?
The great thing about the right way is more what it won't do rather than what it will do. It will not pump raw gasoline into your crankcase should the fabric diaphragm of the original fuel pump spring a leak or rupture. This is so very important because most fuel pump failures take place due to a failure of this diaphragm. Should failure occur the electric fuel pump will continue to work fine, pumping gasoline directly to the carburetor via the "T" mounted on the outlet of original pump. The secret to this is that the original pump has a check valve mounted internally behind this "T" so gasoline pumped via the electric fuel pump never enters the original fuel pump. It makes no difference if the original fuel pump is functioning normally or not at all, no fuel passes through the original fuel pump as a result of electric fuel pump action.
ADDITIONAL SUGGESTIONS
- Choose the correct electric fuel pump. This means making sure you have the correct voltage. Some pumps are polarity sensitive and others may be installed either way. Be certain that your purchase will match the polarity of your classics's electrical system. If you can obtain a pump that has an adjustable pressure, do so. Usually if pounds per square inch will be sufficient. If your new pump isn't adjustable and it tends to flood the carburetor, correct this by installing a fuel pressure regulator between the electric pump and the carburetor. The best place for this is often attaching the regulator to the electric fuel pump with a short pipe nipple.
- Mount it in a secure place, away from excess heat and away from direct road wheel splash. Frequently the electric fuel pump will need a metal shield to protect it from the exhaust system or the blast of hot under hood air driven back by the fan. Many manufacturers supply a kit to quiet the electric fuel pump by isolating it from the metal with rubber blocks. Be certain that the pump is well grounded. An auxiliary wire may be needed to insure this good ground.
- Consider removing the built-in gasoline filter and installing a filter just in front of the carburetor inlet. A filter on the electrical pump may be difficult to get to for cleaning in a road side emergency situation and if it is mounted lower than the fuel tank, as it should be, you are going to have a miniature Niagara Falls to contend with when the filter element is removed.
- Wire the electric fuel pump so that it functions only when the ignition switch is turned on. In addition, mount a second switch so that the electric pump may be turned off for testing purposes. This second switch will permit testing of the original motor mounted fuel pump. This pump should be repaired if it doesn't function. Failure to function may indicate a ruptured or leaking diaphragm which will permit gasoline to leak into the crankcase, although not at the Herculean pace that it would if the electric pump were pumping directly through the original.
- If you really want to play it "cool", install a gasoline shut off valve between the "T" in the inlet fuel line and the original fuel pump. Should the original pump ever fail merely shut off this line and forget all about repairing the original fuel pump until you are dang well ready, such as when the CARAVAN is over and you are back home.
- If any friend tells you to mount your electric fuel pump near the fuel tank because these pumps "push" better than they "pull" smile sweetly and change the subject. Any fuel "pushes" somewhere in the range of 11 lbs. per square inch but your teen-age daughter will tell you that atmospheric pressure is around 14.7 lbs. per square inch. The vacuum produced by a fuel pump will be less than the 14.7 lbs per square inch but it will be far greater than 11 lbs.
- Vapor lock takes place when gasoline is heated to a point that it starts turning from a liquid to a vapor. Under atmospheric pressure of around 14.7 lbs per square inch this will take place around 160 degrees Fahrenheit. The less the pressure, the lower temperature at which this will take place. Translated, this means that vapor lock will take place at a lower temperature in the fuel line that is subject to vacuum, the inlet side. The pressure side, being under fuel pump pressure, will require a higher temperature to permit boiling and the formation of vapor. This is why the fuel line under the hood leading to the carburetor may get relatively hot without causing problems. If the same temperature were applied to the inlet fuel line your Classic wouldn't turn a wheel.
- Mount the electric fuel pump as close to the fuel tank as convenient due to the boiling characteristics of gasoline as explained in #6, not for any "push" or "pull" pump theories you may have heard.
Following a hot run, it is always good policy to raise the hood. When you see Pierce-Arrow owners doing this they aren't really trying to lord it over owners of lesser Classics; they just want to avoid the embarrassment of the thing stalling a block or so down the street if they are lucky enough to get the motor started in the first place. Gasoline in the carburetor bowl is not under pressure and will quickly expand and boil over and/or away. This can result in the screwy combination of a dry carburetor bowl and a flooded intake manifold, spelled T-R-O-U-B-L-E.

- Carburetor
- "T" at outlet side of original pump
- Original motor mounted pump switch
- Original fuel line
- New fuel line
- "T" on inlet side of electric pump
- Electric fuel pump
- Fuel line running to fuel tank
- Ignition
- Auxiliary switch
TECHNICAL — MORE ON FUEL PUMPS
by Paul Clancy
Alas, nothing in this life is simple. Not even the installation of a garden variety of fuel pump on your Classic. Contrary to what you might believe, one can't just cut the fuel line and insert the fuel pump and hook it up to a hand switch. "Sez who," you ask? Well, if you want to do it that way, it is your option, but Buck Varnon and the Indiana's Jim Dougherty who writes for the Hoosier Horn both say it is more complicated than that. Each has a slightly different axe to grind but the result is the same.
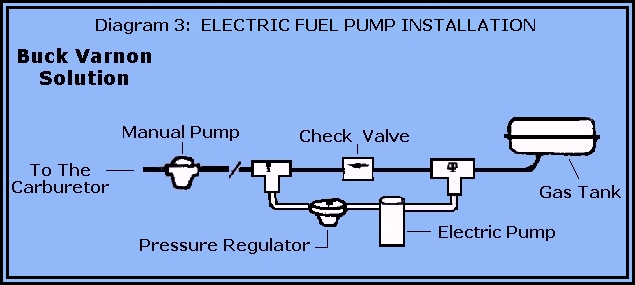
We have written before about Buck's contention that a lot of people mess the installation up by using fittings that do not preserve the original manufacturer's internal dimension of the fuel line, thereby choking down the supply of fuel to the carburetor and inducing the symptoms of vapor lock. Buck also says you cannot just splice an electric fuel pump into the line, because if your mechanical pump is pulling gas through the electric pump, the electric pump acts as a constrictor when it is not running on its own. Again, the engine is not getting the gas the manufacturer intended for the system. The vaper lock symptom jumps up and bites you in the butt. Buck's solution is to build in a bypass around the electric pump incorporating a one way valve so the electric pump cannot feed back to the fuel tank.
Buck also likes to include in the system a fuel pressure regulator. Most Electric fuel pumps deliver a strong pressure, in the neighborhood of 7-10 pounds S/I. Carburetors on the Classics were built to operate as much smaller pressures, from 3 to 5 pounds S/I. The pressure should be set to exactly what the carburetor is built to handle. As an example, if the float needle is designed to handle 31/2 lbs, a pressure of 7 lbs is going to overwhelm it and the level in the float chamber will rise, and the engine will be running in an over rich condition, stumbling and bucking. Stick with the recommended fuel pressure for best running results. Incidentally, a source for purchasing check valves was recommended by Buck as Peninsula Diesel, in Detroit.
I would like to quote Jim Dougherty's article from the Hoosier Horn of the Indiana Region "Every Classic should have an auxiliary electric pump. You are living dangerously if you don't have one, and equally so if you have one that is installed incorrectly.
Most electrical fuel pumps are installed by cutting the fuel line in a convenient location under the chassis and hooking up an electric fuel pump. The electric pump installed in this manner pumps through the mechanical pump on the engine. This type of installation will accomplish two things: It will assist in a vapor lock situation, and will also permit priming the carburetor after the Classic has sat for a time.
Unfortunately, an electric fuel pump installed in this way will also do other things. Should the fabric diaphragm rupture or spring a leak in the mechanical fuel pump, the electric fuel pump will continue to do its thing… pump gasoline. This gasoline will go through the damaged diaphragm into the engine crankcase. This an take place at such a moderate rate that the owner may not be aware of it until the oil level in the crankcase begins to rise on the dipstick. A badly ruptured diaphragm can leak so greatly that sufficient fuel will not reach the carburetor.
A correct fuel pump installation would provide all the needed pluses, yet eliminate the diaphragm leakage problem. Do it right by following these directions:
- Cut the fuel line running from the gasoline tank to the mechanical fuel pump, preferably at least halfway back to the tank.
- Install a "T" in the line and run the line to the electric fuel pump installed and as close to this "T" as space permits. This line from the original fuel line will tie into the inlet tide of the electric fuel pump.
- Remove the carburetor supply line from the owlet side of the mechanical fuel pump and install a "T". Reconnect the carburetor supply into one side of this "T".
- Run a new fuel line from the outlet side of the electric fuel pump to the "T" that you installed on the outlet side of the mechanical pump.
- Wire the electrical side of the electric fuel pump. I suggest a three-way testing toggle switch. This type of switch has a spring tension position in the one "on" position and a normal "on" position in the other. This permits the spring-tensioned on to be used for priming the carburetor and the other "on" position for continuous use if needed. Secondly, do not wire the switch through the ignition switch. This is a must with Startex starting systems and in all eases will let the operator prime the carburetor without sending current through the distributor points while the priming is taking place. Unless you enjoy doing tune-ups to Classic distributors, this feature is of value to you.
Use neoprene fuel lines and take great care to avoid sharp bends. These have a nasty tendency to collapse at anything but smooth large bends. In normal operations . . . the electric fuel pump not operating . . . the fuel will flow from the tank to the carburetor through the original fuel lines and mechanical fuel pump. When the electric fuel pump functions, the fuel will flow through the electric fuel pump and through the added fuel line to the "T" on the outlet side of the mechanical fuel pump and on to the carburetor.
The outlet spring loaded valve on the outlet side of the mechanical fuel pump will not let gasoline flow back into the mechanical pump from the "T". And this feature is the key to this system."
OK, as I see it, Buck's solution incorporates a no return valve in the plumbing around the electric fuel pump installation. Jim's solution uses the mechanical fuel pump itself as the no return feature, but requires that an extra line be brought forward into the engine compartment and be hooked in front of the mechanical pump.
We show you a diagram of Jim's hookup (Diagram 2.) which shows the necessity of the extra line to the engine compartment. Those of you who worry about authenticity should look at Buck's solution (Diagram 3.), which has all the plumbing hidden under the car.

Automatic Park Removal (56th Series)
56TH SERIES PUSH-BUTTON TWIN ULTRMATIC TRANSMISSION
by George Hamlin
A late pre-production improvement in the 56th Series Twin Ultramatic, when equipped with the push-button electric selector, was an automatic park feature that puts the transmission in PARK whenever the ignition is turned off. This is a safety feature and operates regardless of what button was down at the time, or may be pushed while the ignition is off. Many owners desire the automatic park feature removed because:
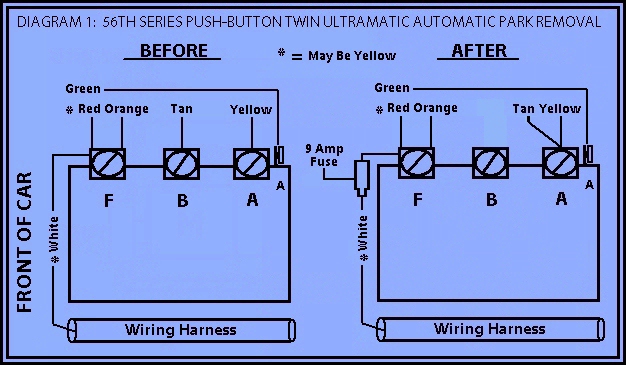
Note: Refer to Diagram 1 as you read this.
- Most selector linkage misalignment, burnout, and breakage occurs at the two end positions of travel, PARK and REVERSE. Almost all the burnout will result from overload in getting the transmission out of PARK on a hill.
- It is frequently necessary to move the car without the engine running, such as when being towed, pushed with a low battery, or undergoing a modern car wash treatment.
- If the car is moving when the ignition is turned off, the transmission will go into PARK as soon as the car slows down to 5-8 mph, damaging the pawl...etc.
There are many ways to accomplish removal of the automatic park, but, only one right way. This procedure is based on the system's being revised to eliminate the control relay, whose functions were obsoleted when the automatic park relay was added. (There are almost no vehicles on the road with the control relay.) The diagrams below show the automatic park relay and its connecting wires as seen from above, leaning over the fender:
- Disconnect one battery cable to prevent shorting during changeover.
- Move the tan wire from terminal B to terminal A. The tan wire carries current to the PARK function; you are changing it from relay actuation to push-button actuation direct. If it were removed and left loose, or cut, the transmission could never go into PARK again.
- Disconnect the white wire from terminal F and connect it to one end or a fuse holder containing a 9-ampere fuse. NOTE: on some cars this wire is yellow.
- Connect the other end of the fuse holder back to terminal F.
IMPORTANT: the fuse is necessary to provide circuit protection formerly provided by the relay, and prevent amusing incidents like fires in the push-button assembly. - Reconnect the battery cable.
The above procedure accomplishes the necessary changeover without disturbing very much the original appearance of the wiring, or permanently disabling the automatic park function. It may be restored at any time by changing the tan wire from terminal A back to terminal P.
The automatic park relay is now nothing more than a binding post, with nothing connected to terminal P. The green wire leading from the rear of terminal A to the system circuit breaker, and the relay itself, now serve no purpose and could be removed by connecting and taping the junctions now screwed to terminal F, and doing the same to those at terminal A. However, this merely consumes time and is not necessary.
Tech Tips
Engine won't start or starts hard
Due to Ignition Wiring Connections:- Loose or corroded connections at the ammeter, ignition switch, coil or distributor.
- Low tension wire insulation cracked or worn through.
- Poor low-tension wire ground connection.
- Loose, corroded or burned ignition switch contacts.
- Faulty ammeter.
- Loose or corroded high tension terminals or cable sockets.
- Cracked, oil soaked, wet chafed or worn high-tension cable insulation.
- High tension cables installed not according to engine Firing order.
- High tension cable from coil to distributor not connected.
- Poor ground between coil and its mounting.
- Poor ground between distributor and engine.
- Breaker point gap much too wide.
- Breaker points not synchronized properly.
- Breaker points dirty, cracked, pitted or burned.
- Breaker arm spring weak or broken.
- Breaker arm sticking.
- Breaker arm grounded due to worn or broken insulating bushing.
- Breaker arm rubbing block loose or badly worn.
- Breaker arm plate loose or not properly grounded.
- Loose breaker plate terminal posts.
- Breaker pigtail Lead wires loose or broken.
- Breaker cam loose due to burrs on cam locking screw taper.
- Incorrect ignition timing.
- Distributor cap cracked.
- Distributor cap inserts bent, loose or badly burned.
- Too much clearance between distributor cap inserts and rotor.
- Grounded rotor.
- Broken, loose or bent rotor spring.
- Distributor cap center terminal (rotor contact missing or broken.
- Distributor cap wet or dirty.
- Broken or bent distributor shaft.
- Distributor shaft worn.
- Distributor shaft bushing or bearing loose or worn.
- Distributor drive gear or coupling sheared, broken or loose on shaft.
- Distributor drive gear not properly with oil pump drive gear.
- Automatic spark advance installed backwards.
- Weak or grounded condenser.
- Defective coil.
- Cracked coil tower.
- Wet or dirty coil tower.
- Battery in low state of charge.
- Battery completely discharged.
- Poor ground connection between battery and frame.
- Poor ground connection between frame and engine.
- Battery terminals badly corroded or loose.
- Cable from starter to battery broken, or terminal cracked.
- Cable from starter to battery is 12 volt and not 6 volt (0 or 00 gauge).
- Cable loose in terminal socket.
- Dead cell in battery.
- Under-sized battery cables.
- Plugs operating too cold, causing fouling.
- Fouled plugs due to an excessively rich carburetor mixture.
- Fouled plugs due to engine oil passing piston rings.
- Fouled plugs due lo their being loose in cylinder head.
- Fouled plugs due to damaged or ineffective plug gaskets.
- Fouled plugs due to improper operation of choke.
- Use of too hot operating plugs, causing pre-ignition.
- Spark plug gaps much too wide.
- Use of some types of spark plug and coil radio suppressors.
- Spark plugs damp or covered with dirt.
- Broken starter pinion.
- Broken flywheel ring gear.
- Sticking starter due to burred tooth on starter pinion or flywheel gear.
- Broken Bendix spring.
- Oil congealed in starter drive due to the use of too heavy a grade.
- Starting switch not operating properly.
- Starting switch not grounded properly.Switch contacts burned or corroded.
- Rotation of starter prevented due to teen armature shaft, cracked or distorted housing, tight bearings, misaligned bearings, lack of lubrication, sludge formation in starter drive, starter not aligned properly with engine.
- Rotation of starter prevented due to timed loose brush connections, loose pigtails, brushes sticking in holders, bent brush plate holder arms, weak or broken brush springs, sticking brush holders, incorrect type of brushes, brushes worn too short.
- Armature shorted.
- Commutator surface dirty, burned, pitted or excessively lubricated.
- High mica between commutator segments due to worn commutator.
- Brush ring set incorrectly or grounded.
- Excessive brush spring tension, causing rapid wear of brushes and commutator.
- Burned out, shorted or open circuited field coils.
- Brushes sticking in brush holder.
- Worn bushings or bearings causing armature to drag against pole pieces.
- Intake manifold and cylinders hooded with fuel due to faulty choke operation.
- Old, stale or a poor grade of fuel being used, particularly during cold weather or after being in dead storage.
- Air Leaks due to cracked intake manifold, air horn gasket broken or damaged, worn throttle she fit bearing, loose manifold attaching nuts, loose carburetor attaching nuts, warped carburetor flange, broken or damaged intake manifold or carburetor gaskets, poor vacuum line connection at the intake manifold, loose or missing intake manifold core hole plugs or warped choke cover.
- Choke valve fails to close fully when starting a cold engine.Broken or loose choke wire.
- Low carburetor float or fuel level.
- Clogged or dirty carburetor screen.
- Inoperative fuel pump.
- Restricted, broken or clogged fuel line from the pump to carburetor.
- Restrictions in carburetor passages due to presence of ice, corrosion or water.
- No fuel supply.
- Ice formation in fuel pump sediment trap.
- Vapor lock.
- Automatic choke control faulty or sticking.
- Leaky carburetor jet gasket so that carburetor is dry after car is parked for some time.
- Spark plugs loose in cylinder head.
- Cylinder head bolts loose.
- Piston rings which are broken, badly worn, weak or stuck.
- Cylinder head gasket damaged or improperly installed.
- Valves held open due to insufficient tappet clearance.
- Valves held open due to warped corroded or gummed stems.
- Valve seating poorly.
- Valve springs weak or broken.
- Broken or loose camshaft or distributor drive shaft gear.
- Valves improperly timed.
- Cracked cylinder block.
- Water in cylinder.
- Excessive internal friction of engine assembly due to insufficient clearances.
- Broken or jammed internal parts of clutch or transmission.
- Engine "seized" due to excessive overheating.
- Broken flywheel ring gear.
- Gasoline tank filler cap clogged.
- Sludge conditions due to water in oil.
Engine misses in one cylinder when idling
Due to Ignition Wiring:- Loose or corroded high tension terminal or cable socket.
- Cracked, oil soaked, wet, chafed or worn high tension cable insulation.
- High tension cable not connected.
- Broken wire inside of cable.
- Stray cable strand shorting spark plug.
- Spark plug operating too cold, causing fouling.
- Spark plug operating too hot, causing pre-ignition.
- Fouled plug due to engine oil passing piston rings.
- Fouled plug due to its being loose in cylinder head.
- Fouled plug due to damaged or ineffective plug gasket.
- Spark plug gap too wide.
- Spark plug gap too narrow.
- Insulator loose in shell.
- Insulator interior coated with carbon, oil or water.
- Insulator cracked, glaze-scratched or melted, allowing carbon deposit etc., to provide path for current.
- Spark plug gap filled with oil, water or fuel.
- Spark plug threads dirty.
- Spark plug shorted by some metal part out of place.
- Defective radio suppressor.
- Valve leaks due to faulty seating.
- Warped valve face.
- Shoulder on valve face.
- Valve sticking.
- Valve burned.
- Carbon on valve seat.
- Valve pitted.
- Cracked valve seat.
- Gum on valve stem.
- Broken valve spring.
- Bent valve stem.
- Valve stem too tight in guide.
- No or incorrect tappet clearance.
- Sticking rocker arm.
- Broken mushroom on lifter assembly.
- Valve insert loose in block.
- Valve lifter screw lock loose or causing valve to be held open.
- Cracked cylinder head.
- Broken cylinder head gasket.
- Distributor cap insert bent, loose or badly burned.
- Air leak around intake valve stem due to excessive stem-to-guide clearance.
- Loss of engine compression in cylinder.
- Slight water leak in cylinder or combustion chamber.
- Ignition points too close with low lobe on cam and worn distributor shaft or loose bushing.
Engine misses, No particular cylinder when idling or Operating below 20mph with no load
Due to Ignition:- Loose or corroded connections or terminals at the ammeter, ignition switch, coil or distributor.
- Slight short in primary circuit wiring.
- Poor low tension wire ground connection.
- Loose, corroded or burned ignition switch contacts.
- Loose or corroded high tension terminals or cable sockets.
- Cracked, oil soaked, wet, chafed or worn high tension cable insulation.
- Poor ground between coil and its mounting.
- Poor ground between distributor and engine.
- Breaker point gap incorrect.
- Breaker points not synchronized properly.
- Breaker points dirty, cracked pitted or burned.
- Breaker arm spring weak or broken.
- Breaker arm sticking.
- Breaker arm insulating bushing worn.
- Breaker arm plate loose or note properly grounded.
- Loose breaker plate terminal posts.
- Breaker plate pigtail leads loose or broken.
- Breaker cam with low lobe.
- Breaker cam loose due to burrs on cam locking screw taper.
- Incorrect ignition timing.
- Distributor cap cracked, wet or dirty.
- Distributor cap inserts bent, loose or badly burned.
- Distributor shaft bent or worn.
- Distributor shaft bushing or bearing loose or worn.
- Weak condenser.
- Defective coil.
- Cracked, wet or dirty coil tower.
- Defective spark plug or coil radio suppressor.
- Defective spark plugs.
- Spark plugs not gapped properly.
- Weak battery.
- Ruptured automatic advance diaphragm.
- Float level too high or too low.
- Idle adjusting screws (dual carburetors) not properly balanced.
- Throttle valves (dual carburetors) not properly synchronized.
- Restricted or partially clogged idle air passage.
- Restricted or partially clogged idle jet or passage.
- Air leaking around throttle shaft.
- Air leaking around idle tube.
- Loose manifold connections.
- Air leak in vacuum lines.
- Loose manifold nuts.
- Broken or damaged carburetor or intake manifold gaskets.
- Cracked intake manifold.
- Contacting surface of intake manifold warped or damaged.
- Slight leak at check valves in fuel pump.
- Punctured diaphragm in vacuum section of combination fuel pump causing fouled spark plugs due to oil being drawn into cylinders.
- Unequal compression in cylinders.
- Slight water leak in cylinders or combustion chambers.
Step 1, check the compression. if it is even across all the cylinders, proceed to Step 2. If not and the missing cylinders are low, remove the side cover and check the valve clearance. I Believe the 288 has mechanical lifters. If they are tight, some valves could be riding.
Step 2, check for spark at each plug. I have seem worn distributor bushings or a bent shaft cause the points to stay closed at some point in its rotation.
Step 3, carefully check the intake manifold for missing hoses or plugs. A vacuum leak can cause that. If you have any vacuum operated goodies, plug the line at the manifold port and see if it helps.Engine misses at high speed
Due to Ignition:- Loose or corroded connections or terminals at the ammeter, ignition switch, coil or distributor.
- Slight short in primary circuit wiring.
- Poor low tension ground connection.
- Loose, corroded or burned ignition switch contacts.
- Loose or corroded high tension terminals or cable sockets.
- Cracked, oil soaked, wet, chafed or worn high tension cable insulation.
- Broken wire inside of cable.
- Stray cable strand shorting spark plug.
- Poor ground between distributor and engine.
- Breaker point gap incorrect.
- Breaker points not synchronized properly.
- Breaker points dirty, cracked, pitted or burned.
- Breaker arm spring weak.
- Breaker arm insulating bushing worn.
- Breaker arm rubbing block loose or badly worn.
- Breaker arm plate loose or not properly grounded.
- Loose breaker plate terminal posts.
- Breaker plate pigtail leads loose or broken 19.Breaker cam with low lobe.
- Breaker cam loose due to burrs on cam locking screw taper.
- Incorrect ignition timing.
- Distributor cap cracked, wet or dirty.
- Distributor cap inserts bent, loose or badly burned.
- Bent or worn distributor shaft.
- Distributor shaft bushing or bearing loose or worn.
- Automatic spark advance plate loose.
- Automatic advance governor springs weak or broken.
- Automatic advance governor weight pins worn.
- Weak condenser.
- Defective coil.
- Cracked, wet or dirty coil tower.
- Defective spark plugs.
- Spark plug gapped too wide.
- Spark plugs operating too hot or too cold.
- Spark plugs loose in cylinder head.
- Fouled plugs due to damaged or ineffective gaskets.
- Faulty radio suppressor.
- Pre-ignition due to any source.
- Weak battery in combination with an inoperative generator.
- Dirty air cleaner.
- Restricted air passages in air cleaner silencer.
- Oil level too high in oil bath type air cleaner, causing restriction.
- Choke valve not fully open.
- Punctured diaphragm in vacuum section of combination fuel pump, causing fouled spark plugs due to oil being drawn into cylinder.
- Float level too low.
- Throttle valves (dual carburetors) 8.Air leak around throttle shaft.
- Loose manifold connections.
- Air leak in vacuum lines.
- Loose manifold nuts.
- Broken or damaged carburetor or intake manifold gaskets.
- Cracked intake manifold.
- Contacting surface of intake manifold being warped or damaged. l
- Slight leak at check valves in fuel pump.
- Improper setting of economizer valve in carburetor.
- Carburetor throttle lever loose on shaft.
- Water in gasoline.
- Clogged filter screens.
- Warped valve face.
- Valve leaks due to faulty seating.
- Valve sticking 4.Valve Badly burned.
- Cracked valve seat.
- Valve spring weak or broken.
- Bent valve stem.
- Valve stem too tight in its guide.
- No or too great tappet clearance.
- Sticking rocker arm.
- Broken mushroom on valve lifter.
- Valve held open due to shoulder on valve face.
- Valve held open due to carbon on valve seat.
- Valve held open due to gum on valve stem.
- Partially restricted or clogged muffler, exhaust pipe or tail pipe.
- Engine overheated.
- Unequal or lack of engine cylinder compression.
- Manifold heat control valve held in closed position.
- Cracked cylinder head.
- Broken cylinder head gasket.
Engine misses at all speeds
Due to Ignition:- Loose or corroded connections or terminals at the ammeter, ignition switch, coil or distributor.
- Low tension wire insulation cracked or worn through.
- Poor low tension ground connection.
- Loose, corroded or burned ignition switch contacts.
- Faulty ammeter.
- Loose or corroded high tension terminals or cable sockets.
- Cracked, oil soaked, wet, chafed or worn high tension cable insulation.
- Broken wire inside of cable.
- Stray cable strand shorting spark plug.
- Wet high tension cables.
- Improper ground between the coil and its mounting.
- Improper ground between the distributor and engine.
- Breaker point gap incorrect.
- Breaker points not synchronized properly.
- Breaker points dirty, cracked, pitted or burned.
- Breaker arm spring weak or broken.
- Breaker arm sticking.
- Breaker arm insulating bushing worn.
- Breaker arm rubbing block loose or badly worn.
- Breaker arm plate loose or not properly grounded.
- Breaker plate terminal posts loose.
- Breaker pigtail leads loose or broken.
- Breaker cam with low lobe.
- Breaker cam loose due to burrs on cam locking screw taper.
- Ignition timing incorrect.
- Distributor cap cracked, wet or dirty.
- Distributor cap inserts bent, loose or badly burned.
- Worn or bent distributor shaft.
- Distributor shaft bushing or bearing loose or worn.
- Automatic advance plate loose.
- Automatic advance governor springs weak or broken.
- Automatic advance governor sticking or dirty.
- Automatic advance governor pins worn.
- Weak condenser.
- Defective coil.
- Cracked, wet or dirty coil tower.
- Defective spark plugs.
- Spark plugs loose in cylinder head.
- Fouled plugs due to damaged or ineffective gaskets.
- Spark plugs operating too hot or too cold.
- Pre-ignition from any source.
- Faulty spark plug or coil radio suppressor.
- Float level too high or too low.
- Throttle valves (dual carburetors) not properly synchronized.
- Air leak around throttle shaft.
- Loose manifold connections.
- Air leak in vacuum lines.
- Loose manifold nuts.
- Broken or damaged carburetor or intake manifold gaskets.
- Cracked intake manifold.
- Contacting surface of intake manifold being warped or damaged.
- Slight lead at check valves in fuel pump.
- Punctured diaphragm in vacuum section of combination fuel pump, causing fouled plugs.
- Dirty carburetor air cleaner.
- Restricted air passages in air cleaner silencer.
- Oil level too high in oil bath type air cleaner, causing restrictions.
- Choke valve not fully open.
- Improper setting of economizer valve in carburetor.
- Carburetor throttle lever loose on throttle shaft.
- Water in gasoline or poor grade of gasoline.
- Valve leaks due to faulty seating.
- Warped valve face.
- Shoulder on valve face.
- Valve sticking.
- Valve burned.
- Carbon on valve seat.
- Valve pitted badly.
- Cracked valve seat.
- Gum on valve stem.
- Broken or weak valve spring.
- Bent valve stem.
- Valve stem too tight in its guide.
- No and too much clearance.
- Sticking rocker arm.
- Broken mushroom on valve lifter.
- Partially restricted or clogged muffler, exhaust pipe or tail pipe.
- Engine overheated.
- Unequal or lack of engine cylinder compression.
- Hole in piston head.
- Manifold heat control valve held in closed position.
- Cracked cylinder head.
- Broken cylinder head gasket.
Poor high speed performance or Lack of power
Due to Ignition:- Loose or corroded connections or terminals at the ammeter, ignition switch, coil or distributor.
- Slight short in primary circuit wiring.
- Poor low tension wire ground connection.
- Loose, corroded or burned ignition switch contacts.
- Faulty ammeter.
- Loose or corroded high tension terminals or cable sockets.
- Cracked, oil soaked, wet or worn high tension cable insulation.
- Improper ground between coil and its mounting.
- Improper ground between distributor and engine.
- Breaker point gap incorrect.
- Breaker points not synchronized properly.
- Breaker points dirty, cracked, pitted or burned.
- Breaker arm spring weak.
- Breaker arm sticking.
- Breaker arm insulating bushing worn.
- Breaker arm rubbing block loose or badly worn.
- Breaker arm plate loose or not properly grounded.
- Breaker plate terminal posts loose.
- Breaker pigtail leads loose or broken.
- Breaker cam with low lobe.
- Breaker cam loose due to burrs on cam locking screw taper.
- Incorrect ignition timing.
- Distributor cap cracked, wet or dirty.
- Distributor cap inserts bent, loose or badly burned.
- Distributor shaft bent or worn.
- Distributor shaft bushing or bearing loose or worn.
- Distributor drive gear not timed properly with oil pump drive gear.
- Vacuum spark advance diaphragm or spring broken.
- Automatic spark advance plate stuck or loose.
- Automatic advance governor springs weak or broken.
- Automatic advance governor sticking or dirty.
- Automatic advance governor pins worn.
- Weak condenser.
- Defective coil.
- Cracked, wet or dirty coil tower.
- Defective spark plugs.
- Spark plugs operating too cold or too hot.
- Spark plugs improperly gapped.
- Spark plugs loose in cylinder head.
- Fouled plugs due to damaged or ineffective gaskets.
- Pre-ignition due to any source.
- Defective radio suppressors.
- Fuel level too high -- causing a flooded condition.
- Fuel level too low -- causing a starved condition.
- Excessive fuel pump pressure -causing a flooded condition.
- Low fuel pump pressure -- causing a starved condition.
- Float punctured and partially filled with fuel -- causing a hooded condition.
- Float needle valve leaking due to dirt or wear.
- External carburetor Leads.
- Accelerating pump improperly adjusted.
- Economizer piston stuck in its cylinder.
- Economizer valve stem sticking in its guide.
- Economizer valve and accelerating pump control linkage not properly adjusted.
- Internal Yak due to accelerating pump valve not seating properly.
- Economizer or power valve not seating properly causing internal leak.
- Internal Yak due to broken or cracked passages.
- Use of metering jets, metering pins or nozzles which are too small.
- Loose plugs or damaged gaskets at base of main discharge nozzles.
- Manifold heat control valve held in closed position.
- Dirty or restricted carburetor air cleaner.
- Oil level too high in oil bath type air cleaner.
- Choke native not fully open.
- Carburetor throttle lever loose on throttle shaft.
- Throttle linkage not properly adjusted -- preventing a full throttle opening.
- Carburetor adjusted for normal altitudes may have a rich adjustment at high altitudes, and vice verse.
- Unequal or insufficient cylinder compression.
- Restricted or clogged muffler, exhaust pipe or tail pipe.
- Engine overheated.
- Excessive internal friction -- due to insufficient engine clearance.
- Connecting rods misaligned.
- The use of too heavy a grade engine oil.
- The use of expansion rings under piston rings -- causing excessive friction.
- Clutch slipping.
- Tires under-inflated.
- Rear axle misaligned.
- Brakes dragging.
- Bearings too tight in wheel, pinion, differential or transmission.
- The use of oversize tires.
- A gear ratio which is too low.
- Incorrect valve timing.
- A slow-reading speedometer gives the impression of lack of power.
- Excessive front wheel toe-in or toe-out.
- Loose fan blade.
- Unbalanced fan.
- Engine mountings not properly adjusted or loose.
- Scored pistons.
- Loose or worn timing gears or chain sets up torsional vibration causing automatic advance governor failure.
Loss of engine compression
Due to Valves:- Weak or broken valve springs.
- Valves held open due to insufficient tappet clearance.
- Sticking valves due to insufficient valve stem-to-guide clearance.
- Sticking valves due to carbon deposits or gum on the valve stems and in the valve guides.
- Warped or broken valve heads.
- Bent valve stems.
- Pitted, burned or distorted valve seats.The entire list of defects in engine parts has already been completed.It will be evident from the two samples above that by explaining what engine troubles detects will cause, the reader mill have an excellent background for using our system of diagnosis intelligently.
- Scored cylinder walls.
- Excessive clearance between cylinder walls and pistons.
- Tapered or eccentric cylinder bores.
- Worn ring grooves.
- Undersized rings.
- Hole in piston head.
- Insufficient ring tension.
- Rings stuck in grooves due to gum or carbon deposit.
- Scored piston ring faces.
- Scored pistons.
- Insufficient piston ring end gap clearance may cause scored cylinders.
- Broken cylinder head gasket.
- Loose cylinder head bolts.
- Spark plugs loose in cylinder head.
- Compression loss due to faulty spark plug gaskets.
- Warped cylinder head.
Engine backfires through the carburetor
Check for:- Incorrect valve timing.
- Incorrect ignition timing.
- Improper choke action in conjunction with cold engine.
- Intake valves not seating properly.
- Pre-ignition.
- Excessively lean carburetor mixture.
- Abnormally rich carburetor mixture.
- Intake manifold air leaks.
- Broken cylinder head gasket between cylinders.
- Spark plug cables installed not according to engine firing order.
- Distributor governor sticking.
- Poor quality fuel 13.Shorted distributor cap.
- Wet distributor cap or wires.
Pre-ignition or spark knock
Check for:- Ignition timed too early.
- Weak distributor automatic advance springs.
- Combustion chamber with large carbon deposits.
- Spark advance not operating upon acceleration.
- Use of spark plug which is too hot.
- Spark plug electrodes or insulators burned or carbonized.
- Sharp metallic edges in combustion chamber.
- Cylinder head gasket projecting into combustion chamber.
- Excessively lean carburetor mixture.
- Automatic heat control valve held in closed position.
- Engine overheated.
- Poor grade of fuel.
- Old or stale fuel which has lost its volatility.
- Using a high compression cylinder head with standard fuel.
- Hot engine valves caused by incorrect valve seat width.
- Hot engine valves caused by insufficient tappet clearance.
- Hot engine valves due to use of wrong type or valves having thin edges.
Excessive Oil Consumption
Due to External Leaks:- Leak at oil gauge pipe connections.
- Leak at oil filter lines.
- Improperly installed rear camshaft bearing Welch plug.
- Loose rear camshaft bearing Welch plug.
- Loose fuel pump or faulty gasket.
- Timing gear cover not properly centered.
- Faulty crankshaft oil scats.
- Crankshaft pulley hull eccentric.
- Restricted oil return groove in pulley hub.
- Rough crankshaft pulley hub.
- Crankshaft pulley nut, washer or gasket not properly installed.
- Oil pan gasket broken or improperly installed.
- Oil pan cap screws loose.
- Oil pan gasket flange distorted.
- Oil pan cracked.
- Oil pan drain plug loose.
- Oil pan drain plug gasket missing or damaged.
- Timing gear cover gasket broken or improperly installed.
- Timing gear cover bolts loose.
- Timing gear cover flange distorted.
- Timing gear cover cracked.
- Valve cover plate gasket broken or improperly installed.
- Breather housing or housing tube loose or clogged.
- Oil pump cover gasket broken, loose or improperly installed.
- Valve stems or guides worn.
- Piston rings badly worn or scuffed.
- Broken piston rings.
- Insufficient ring tension.
- Insufficient end gap clearance of piston rings which may cause cylinder scores.
- Poor quality oil.
- Oil of improper viscosity.
- Oil which is badly diluted.
- Excessive amount of oil in oil pan.
- Continuous high speed operation.
- Excessive oil pressure.
- Punctured diaphragm in vacuum section of combination fuel pump.
- Scuffed pistons.
- Excessive clearance between cylinder walls and pistons.
- Tapered, scored or eccentric cylinder bores.
- Abnormally high crankcase temperatures.
- Excessive clearance between intake valve stems and guides.
- Crankshaft journals out of round.
- Main and connecting rod bearings with excessive end wise or radial clearance.
- Cylinder block distorted due to uneven tightening of cylinder head bolts.
- Bearing chipped.
Low oil pressure
Check for:- Excessive clearance between push rods and guides.
- Use of badly diluted engine oil.
- Use of too light a grade of engine oil.
- Oil pump intake screen clogged with water, sludge, fee or dirt.
- Weak or broken oil relief valve spring.
- Relief valve spring not adjusted properly.
- Relief valve face or seat distorted.
- Relief valve face or seat held open by dirt, ate.
- Air leak in oil pump suction line.
- Excessive clearance of oil pump gears in pump body.
- Oil pump gears which are damaged or badly worn.
- Loose oil pump body or cover.
- Oil pump gaskets improperly installed or damaged.
- Broken oil pipe or tube.
- Loose oil pipe or tube connections.
- Excessive clearance of main, connecting rod or camshaft bearings.
- Inaccurate oil pressure gauge giving an impression of low oil pressure.
- Bearings chipped.
- Bearing caps filed out of round.
High oil pressure
Check for:- Use of too heavy a grade of engine oil.
- Restricted oil passage at the relief valve.
- Relief valve improperly adjusted.
- Relief valve spring too stiff or too heavy.
- Stuck relief valve.
- Inaccurate oil pressure gauge gives impression of high oil pressure.
Engine oil filter inoperative
Check for:- Filter element clogged.
- Inlet or outlet pipes, passages or connections clogged or restricted.
- Inlet or outlet pipes, passages connections leaking.
Crankshaft noise
Check for:- Loose crankshaft gear or sprocket.
- Loose flywheel.
- Loose vibration damper.
- Engine oil too thin due to dilution.
- Sprung crankshaft.
- Excessive radial bearing clearance.
- Excessive crankshaft end play.
- Low oil pressure.
- Bearing misalignment.
- Out of round or eccentric journals.
- Insufficient oil supply.
- Distorted crankcase.
- Broken crankcase web.
- Flywheel or clutch out of balance.
Connecting rod noise
Check for:- Out of round or eccentric crank pins.
- Excessive radial bearing clearance.
- Insufficient oil supply.
- Low oil pressure.
- Engine oil too thin due to dilution.
- Connecting rods misaligned.
- Bearing caps filed.
- Oil dippers not supplying oil to bearings.
Piston or piston pin noise
Check Pistons for:- Collapsed piston skirts.
- Insufficient piston pin clearance.
- Excessive clearance between piston and cylinder bore.
- Connecting rod misalignment.
- Tapered or eccentric cylinder bores.
- Rings or piston butting against ridge at of cylinder bore.
- Piston head buying against projecting cylinder head gasket.
- Broken or stuck piston rings.
- Excessive vertical clearance between ring and ring groove.
- Piston pin hole not square with the piston.
- Piston ring lands not relieved properly.
- Piston head butting against carbon accumulation at of cylinder bore.
- Scored piston.
- Piston pin frozen.
- Loose piston pin clamp screw.
- Excessive piston pin clearance.
- Piston slap caused by insufficient piston pin clearance.
- Piston pin loose in connecting rod.
- Piston pin rubbing cylinder wan.
- Upper end of connecting rod rubbing against piston pin boss.
- Oil passage through rod clogged.
Valve or valve lifter noise
Check for:- Worn lifter adjusting screw face.
- Lifter adjusting screw face not machined properly.
- Lifter adjusting screw threads stripped or crossed.
- Weak valve springs.
- Excessive valve stem to tappet clearance.
- Lifter assembly loose on the cylinder block.
- Excessive clearance between lifter and guide.
- Lifter misaligned on cylinder block.
- Lower end of the lifter broken, worn, chipped, rough or scored.
- Too much or too little clearance between valve stem and guide.
- Warped valve head.
- Valve head face or valve seat face not concentric with valve stem axis.
- Rough cam surfaces.
- Rough lifter bore surfaces.
- Valve seat insert loose.
Engine vibration at idle
Check for:- Vibration damper not assembled properly.
- Vibration damper not adjusted properly.
- Vibration damper loose on crankshaft.
- Inoperative damper due to sticking.
- Excessive timing gear or chain lash.
- Timing gears or sprockets loose on camshaft or crankshaft.
- Engine slightly loose in mountings.
- Clutch linkage cross shaft not free or not properly lubricated.
- Excessive clearance at front camshaft bearing.
- Excessive clearance at front crankshaft bearing.
- Eccentric timing gear - usually due to high key.
- Loose timing chain.
Engine vibration especially at high speed
Check for:- Engine missing at high speed.
- Loose fan blade.
- Unbalanced fan.
- Uneven cylinder compression.
- Distributor points not synchronized.
- Engine mountings not adjusted properly.
- Loose engine mountings.
- Crankshaft which is sprung or unbalanced.
- Engine support loose.
- Scored pistons.
- Insufficient clearances of internal engine parts.
- Flywheel loose.
- Fan belt worn or broken.
Engine noises due to other conditions
Check for:- Manifold heat control valve rattle.
- Loose flywheel on crankshaft.
- Crankshaft pulley or vibration damper loose on crankshaft.
- Front or rear engine supports loose or broken.
- Engine loose in frame.
- A thin-walled manifold may produce a roaring noise.
- Exhaust pipe loose at manifold connections.
- Foreign object in exhaust passages or manifold.
- Intake to exhaust manifold gaskets blown.
- Exhaust pipe rubbing against engine side pan or frame.
- Loose engine side pan.
- Loose units such as generator, water pump, fan, horn, etc.
- Engine rubbing against dash.
- Transmission rubbing against floor boards.
- Water pump noisy.
- Camshaft end play excessive.
Oil pump & distributor shaft noise
Check for:- End play in distributor drive shaft.
- End play in oil pump drive shaft.
- Oil pump not rigidly mounted.
- Scullfed or damaged oil pump drive gears.
- Worn or damaged oil pump and distributor driven gear.
- Worn or damaged camshaft drive gear.
- Oil pump drive and driven gears not meshed properly.
- Couplings loose on shaft.
- Excessive clearance of shaft in pump body.
- Excessive clearance of shaft in distributor bracket bushings.
- Hydraulic oil pump noise or rap.
- Noise telegraphed through oil lines.
- Relief valve clogged causing excessive oil pressure.
Excessive fuel consumption
Due to Ignition:- Loose or corroded connections or terminals at the ammeter, ignition switch, coil or distributor.
- Slight short in primary circuit wiring.
- Poor low tension wire ground connection.
- Loose, corroded or burned ignition switch contacts.
- Faulty ammeter.
- Loose or corroded high tension terminals or cable sockets.
- Cracked, oil soaked, wet, chafed or worn high tension cable insulation.
- Poor ground between coil and its mounting.
- Poor ground between distributor and engine.
- Breaker points not spaced properly.
- Breaker points dirty, cracked, pitted or burned.
- Breaker arm spring weak.
- Breaker arm sticking.
- Breaker arm insulating bushing worn.
- Breaker arm rubbing block loose or badly worn.
- Breaker arm plate loose or not properly grounded.
- Breaker plate terminal posts loose.
- Breaker pigtail lead wires loose or broken.
- Ignition timing too late.
- Distributor cap cracked, dirty or wet.
- Distributor cap inserts bent, loose or badly burned.
- Distributor shaft bent or worm.
- Distributor shaft bushing or bearing loose or worn.
- Distributor drive gear not timed properly with oil pump drive gear.
- Vacuum spark advance diaphragm or spring broken.
- Automatic spark advance plate stuck or loose.
- Automatic advance governor springs weak or broken.
- Automatic advance governor sticking or dirty.
- Automatic advance governor pins worn.
- Weak condenser.
- Defective coil.
- Cracked, wet or dirty coil tower.
- Defective spark plugs.
- Spark plugs operating too hot or too cold.
- Spark plugs improperly gapped.
- Spark plugs loose in cylinder head.
- Fouled plugs due to damaged or ineffective gaskets.
- Pre-ignition due to any source.
- Weak battery.
- Defective spark plugs or coil radio suppressors.
- Fuel level too high.
- Excessive fuel pump pressure.
- Float punctured and partially with fuel.
- Float needle valve leaking due (o wear or dirt.
- External carburetor leaks.
- Accelerating pump improperly adjusted.
- Economizer piston stuck in its cylinder.
- Economizer valve stem sticking in its guide.
- Economizer valve and accelerating pump control linkage not properly adjusted.
- Internal leak due to accelerating pump valve not seating properly.
- Economizer or power valve not seating properly causing internal leak.
- Economizer valve operating too quickly.
- Internal leak due to broken or cracked passages.
- Use of metering jets, metering rods or nozzles which are too large.
- Loose plugs or damaged gaskets at base of main discharge nozzles.
- Manifold heat control valve held in closed position.
- Dirty or restricted carburetor air cleaner.
- Oil Level too high in oil bath type air cleaner.
- Choke valve not fully open.
- Carburetor adjusted for normal altitudes may have too rich a mixture at higher altitudes.
- Automatic choke not functioning properly.
- Fuel pump diaphragm leaking.
- Abnormally fast engine idle speed.
- Unequal or insufficient cylinder compression.
- Restricted or partially clogged muffler, exhaust or tail pipe.
- Engine overheated.
- Excessive internal friction - due to insufficient engine clearances.
- Connecting rods misaligned.
- The use of expansion rings under piston rings - causing excessive friction.
- The use of too heavy a grade engine oil.
- Clutch slipping.
- Tires under-inflated.
- Rear axle misaligned.
- Brakes dragging.
- Bearings too tight in wheel, pinion, differential or transmission.
- A gear ratio which is too low.
- Incorrect valve timing.
- Excessive front wheel toe-in or toe-out.
- Scored pistons.
- Loose or worn timing gears or chain sets up torsional vibrations, causing failure of automatic advance governor in distributor.
- High speed operation for long periods.
- Long period of idle operation.
- Constant operation on short trips only.
- Numerous starts and stops due to operation in congested traffic.
- Failure to use cooling system thermostat or radiator covers, etc. in cold weather.
- Sudden starting and stopping.
- High speed driving.
Manifold leaks
Check for:- Missing or loose intake manifold core hole plugs.
- Broken or damaged gaskets.
- Leaks due to improper connections or broken vacuum lines.
- Loose manifold nuts.
- Not enough threads on manifold studs causing nuts to bottom.
- Not enough threads on manifold studs causing nuts to bottom.
- Misaligned or distorted gasket surfaces on the intake or exhaust manifold, carburetor flange or between the carburetor flange and spacer.
- Excessive back pressure due to restricted or clogged muffler, exhaust pipe or tail pipe.
- Misaligned parts between manifold and cylinder block.
- Manifold cracked.
Fuel delivery insufficient
Check for:- Fuel pump filter bowl loose or Fuel pump filter screen restricted or partially clogged.
- Fuel pump filter bowl gasket not scaling properly.
- Punctured or worn fuel pump diaphragm.
- Leak occurring around fuel pump diaphragm shaft or pull rod.
- Loose fuel pump valve scats.
- Fuel pump valves not seating properly.
- Fuel pump valves sticking.
- Fuel pump rocker arm shaft out of place.
- Fuel pump rocker arm broken.
- 10 Fuel pump rocker arm not following or contacting engine camshaft.
- 11 Gasoline tank vent cap restricted.
- Gasoline line from tank to fuel pump collapsed or partially clogged.
- Vapor locked gasoline line between tank and fuel pump.
- Air leak at connections or gasoline lines.
- Gasoline tank outlet pipe partially clogged or bent.
- Air leak above the fuel level in gasoline tank outlet pipe.
- Pump linkage worn.
Fuel pump noise
Check for:- Scored rocker arm or camshaft eccentric.
- Diaphragm spring rubbing on fiver bushing.
- Rocker arm or pin worn.
- Fuel pump linkage striking the diaphragm protector.
- Fuel pump connection to engine loose.
- Rocker arm contact spring weak or broken.
- Rocker arm rubbing against inner surface of crankcase.
- Warped spring on vacuum side.
Ignition troubles
Due to Ignition Wiring & Connections:- Loose or corroded connections or terminals at the ammeter, ignition switch, coil or distributor.
- Low tension wire insulation cracked or worn through.
- Poor low tension wire ground connection.
- Loose, corroded or burned ignition switch contacts.
- Faulty ammeter.
- Loose or corroded high tension terminals or cable sockets.
- Cracked, oil soaked, wet, chafed or worn high tension cable insulation.
- High tension cables installed not according to engine firing order.
- High tension cable from coil tower to distributor not connected.
- Broken wire inside of cable.
- Stray cable strand shorting plug.
- Improper ground between coil and its mounting.
- Improper ground between coil and its mounting.
- Improper ground between distributor and engine.
- Breaker point gap incorrect.
- Breaker points not synchronized properly.
- Breaker points dirty, cracked, pitted or burned.
- Breaker arm spring weak or broken.
- Breaker arm sticking.
- Breaker arm grounded due to worn or broken insulating bushing.
- Breaker arm rubbing block: badly worn.
- Breaker arm plate loose properly grounded or loose breaker plate terminal posts.
- Breaker pigtail lead wires loose or broken.
- Breaker cam with low lobe or breaker cam loose due to burrs on cam locking screw taper.
- Ignition timed too early.
- Ignition timed too late.
- Distributor cap cracked.
- Distributor cap inserts bent, loose or badly burned.
- Too much clearance between distributor cap inserts and rotor.
- Grounded rotor.
- Broken, loose or bent rotor spring.
- Distributor cap center terminal (rotor contact) missing or broken.
- Distributor cap wet or dirty.
- Broken or bent distributor shaft.
- Distributor shaft worn.
- Distributor shaft bushings or bearing loose or worn.
- Distributor drive gear or coupling sheared, broken or loose on shaft.
- Distributor drive gear not timed or or not properly with oil pump drive gear.
- Vacuum spark advance diaphragm broken.
- Vacuum spark advance spring broken.
- Automatic spark advance plate stuck or loose.
- Automatic spark advance plate installed backwards.
- Automatic advance governor springs weak or broken.
- Automatic advance governor springs weak or broken.
- Automatic advance governor pins worn.
- Weak condenser.
- Grounded condenser.
- Defective coil.
- Cracked coil tower.
- Wet or dirty coil tower.
- Battery in low state of charge.
- Battery completely discharged.
- Poor ground connection between battery and frame.
- Poor ground connection between frame and engine.
- Battery terminals badly corroded or loose.
- Cable from starter to battery broken or terminal cracked.
- Cable loose in terminal socket.
- Fouled plugs due to too cold an operating plug.
- Fouled plugs due to an excessively rich carburetor mixture.
- Fouled plugs due to engine oil passing piston rings.
- Fouled plugs due to their being loose in cylinder head.
- Fouled plugs due to damaged or ineffective spark plug gaskets.
- Fouled plugs due to improper operation of choke.
- Use of too hot an operating plug causing pre-ignition.
- Spark plug gap too wide.
- Spark plug gap too narrow.
- Insulator loose in shell.
- Insulator interior coated with carbon, oil, lead bromide, water or salt.
- Insulator cracked, glaze-scratched or melted - allowing carbon deposit etc., to provide a path for current.
- Spark plug gap filled with oil water or fuel.
- Spark plugs threads dirty.
- Spark plug shorted by some metal part out of place.
- Use of some types of spark plug and coil radio suppressors.
Starter not operating properly or inoperative
Check for:- Battery in low state of charge.
- Battery completely discharged.
- Poor ground connection between battery and frame or from frame to engine.
- Battery terminals badly corroded or loose.
- Cable from battery to starter broken or terminal cracked.
- Broken starter pinion.
- Broken flywheel ring gear.
- Sticking starter due to burred teeth on starter pinion or flywheel ring gear.
- Broken Bendix spring.
- Use of engine oil which is too heavy - especially in cold weather.
- Starting switch not operating properly.
- Starting switch not grounded properly.
- Rotation of starter excessively resisted due to bent armature shaft, cracked or distorted housing, tight bearing, misaligned bearings, lack of lubrication sludge formation in starter drive' starter not aligned properly with engine.
- Improper functioning of starter brushes due to loose brush connections, loose pigtails, brushes sticking in holders, bent brush holder arms, weak or broken brush springs, sticking brush holders, incorrect type of brushes, brushes worn too short.
- Armature shorted.
- Commutator surface dirty, burned, pitted excessively lubricated.
- High mica between commutator segments due to worn commutator.
- Brush ring set incorrectly or grounded.
- Excessive brush spring tension - causing rapid wear of brushes and commutator.
- Burned out, shorted or open-circuited field coils.
- Worn bushings or bearings causing armature to drag against pole pieces.
- Battery cables Undersized.
- Winding thrown from armature.
Starter drive noises
Check for:- Starting motor loose on engine.
- Starter motor not properly mounted.
- Starter motor armature shaft bearing worn, broken or dirty.
- Starter pinion teeth burred, chipped or otherwise damaged.
- Flywheel teeth burred, chipped or otherwise damaged.
- Starter drive shaft sprung, bent or distorted.
Generator not charging properly or inoperative
Check for:- Engine idles too low on cars with free wheel and overdrive.
- Incorrect size generator drive pulley.
- Slipping belt.
- Generator drive pulley loose on shaft.
- Ammeter indicates no charging rate or incorrect charging rate.
- Cutout relay points remaining open.
- Generator regulator not operating properly.
- Commutator not concentric.
- Armature open-circuited, causing a low or no charging rate.
- Armature grounded.
- Generator pole piece loose, preventing easy rotation of armature.
- Short circuit between commutator bars.
- Bent or worn armature shaft, producing generator noise.
- Brushes improperly seated or worn.
- Incorrect type brushes being used.
- Brush springs weak or broken.
- High mica between commutator bars.
- Commutator glazed, charred or dirty.
- Brush holder arms sticking, probably caused by excessively worn brushes.
- Field coils open-circuited, short circuited or burned out.
- Brushes oily or soft due to excessive lubrication.
Generator noises
Check for:- Generator loose on engine.
- Generator drive belt not aligned properly.
- Generator pulley loose on shaft.
- Cracked pulley.
- Generator shaft having excessive end play.
- Generator bearings worn.
- Bearings not lubricated sufficiently.
- Generator brush noises caused by: Brushes loose in holder. Rough or dirty commutator. High mica between commutator bars. High commutator bars. Brushes not seating properly. Too little or too much brush spring tension. Hard spots on brushes. Field magnets loose and rubbing armature.
Frequent battery charging necessary
Due to Internal Battery Conditions:- Ineffective battery plate separators.
- Plates badly sulphated.
- A leak in cell due to crack, or scaling compound not sealing properly.
- Water level not maintained at proper height.
- Stop light switch closed at all times.
- Tail and stop damp wires reversed.
- Use of too high candle power headlamp bulbs.
- Car operation confined mostly to night driving.
- Excessive use of spot lamps, radio, car heater, cigar lighter or defroster.
- Lighting circuit grounded or shorted.
- Using headlamps excessively while car is parked.
- Generator inoperative.
- Fan belt slipping.
- Incorrect size generator drive pulley.
- Ammeter indicating higher charging rate than actual.
- Generator regulator not adjusted properly.
- Engine idle too low, particularly on cars with free wheel and overdrive.
- Loose external circuit connections.
- Corroded battery terminals and/or ground connection.
- Starter commutator badly worn or burned.
- High mica between commutator bars.
- Use of starter too frequently.
- Excessive use of starter due to starting difficulties.
Faulty headlamp action
Check for:- Loose connections at ammeter.
- Bulbs loose in sockets.
- Poor contacts at lighting switch.
- Loose or dirty connections at cable terminals or bulb contacts.
- Headlamp reflector or body having a poor ground.
- Battery in a discharged or semi discharged condition.
- Poor battery ground connection, causing rapid bulb failure.
- Loose contact between lamp body and reflector.
- Faulty generator or regulator action.
- Intermittent short or grounding wiring harness.
Excessive engine temperature
Due to Pre-Ignition:- Ignition timed too early.
- Weak distributor automatic advance springs.
- Combustion chamber with large carbon deposits.
- Spark advance not operating upon acceleration.
- Use of spark plugs which arc too hot.
- Spark plug electrodes or insulators burned or carbonized.
- Sharp metallic edges in combustion chamber.
- Cylinder head gasket projecting into combustion chamber.
- Excessively lean carburetor mixture.
- Automatic heat control valve held in closed position.
- Poor grade of fuel being used.
- Stale fuel which has lost volatility.
- Using a high compression cylinder head with standard fuel.
- Hot engine valves caused by incorrect valve seat width.
- Hot engine valves caused by insufficient valve tappet clearance.
- Hot engine valves due to use of wrong type.
- Hot engine valves due to their having thin edges.
- Radiator leak.
- Any water hose leakage.
- Leaky cooling system drain plug valve.
- Leaky water pump.
- Broken water pump gasket - or air cooling system gasket.
- Cracked cylinder head or block causing an internal or external leak.
- Water loss through overflow pipe especially when engine is overheated. 8. Radiator upper tank baffle plate loose.
- Loose cylinder head cap screws or broken cylinder head gasket, allowing combustion gases to leak into the cooling system, causing overheating.
- Loss of water at high speed due to an air leak at the water pump packing gland.
- Loose or corroded water jacket cover plate.
- Ignition timed too late.
- Slipping fan belt.
- Radiator core covered with dirt or heavy paint.
- Radiator core surface restricted by license plate or emblems.
- Heavy sludge or dirt accumulation in engine block.
- Water manifold rusted, loose or damaged.
- Engine thermostat not installed properly or not opening.
- Collapsed or deteriorated water hose.
- Water pump impeller loose on shaft.
- Too much clearance between pump housing and impeller.
- Use of certain types of anti-freeze solution during warm weather periods.
- Water transfer holes in cylinder block or cylinder head restricted. 14. Cylinder head gasket installed in such a manner so as to restrict the flow of water.
- Fan blades not pitched properly.
- Using a rear axle gear ration which is too fast, or over sized tires in mountainous regions.
- Brakes dragging.
- Wheel bearings too tight.
- Clutch slipping.
- High frictional resistance in engine caused by: Insufficient oil circulation, Internal clearances of engine parts insufficient. Internal engine parts not aligned. Use of too heavy a grade engine oil.
- High frictional resistance in power train transmitting units.
- A floating foreign object in cylinder head which occasionally restricts water circulation.
- Screen for hugs in front of radiator too fine.
Water pump noise
Check for:- Water pump shaft pulley loose.
- Impeller loose on shaft.
- Too much end play in pump shaft.
- Too much clearance between water pump shaft and bushings.
- Impeller blades rubbing against water pump housing.
- Impeller pin sheared off or impeller broken.
- Rough bearing.
- Water pump seal too hard.
Fan & fan belt noise
Check for:- Bent or distorted fan blades.
- Fan blades not pitched properly.
- Fan shad bushing loose.
- Improper lubrication of fan shaft bushing.
- Excessive fan shaft end play.
- Unbalanced fan blade assembly.
- Fan hub loose and turning on shaft.
- Fan blades loose on hub or spider.
- Fan blades striking radiator core or fan belt.
- Any drive pulley cracked or distorted.
- Fan belt pulleys misaligned.
- Belt too tight causing squeak.
- Belt too loose causing squeak upon acceleration.
- Dirt, grease, rust or other foreign matter on belt or pulleys.
- Incorrect fan belt being used.
- Belt worn or badly burned.
Early fan belt failure
Check for:- Rough or broken fan pulley flanges.
- Misalignment of belt pulleys.
- Belt stretched abnormally due to too tight adjustment.
- Belt too loose causing excessive slippage.
- Wrong type belt being used.
- Oily or greasy belt will rapidly deteriorate.
- Belt striking or rubbing blades.
- Operating at sustained high speeds.
- Belt overloaded due to excessive friction in water pump, generator or fan.
- Generator mounting bolts loose.
Noises due to other conditions
Check for:- Hubcap contains broken hubcap retainer clip.
- Hubcap contains loose cloissine retaining nut.
- Hubcap contains loose grease cap.
- Hubcap contains loose lug nut, cotter pin, or axle nut.
Convert or not to convert to 12volt
If you are trying to decide whether or not to convert from a 6 volt (v) to a 12v system, it is a waste of time and money - unless you don't care about originality or you are building a "hot rod" or have a need to spend money before the wife decides she needs a home improvement with your spare cash.
The electrical accessories, gauges, bulbs, etc. will not handle more than 8v. Tampering with the original car in this way detracts from its extrinsic and intrinsic value with nothing gained in the end.
If your interest is to be able to install a modern 12v accessory such as a CD player, there are inverter boxes that can be direct wired (or plugged into the cigarette lighter) to convert 6v to 12v to play any 12v accessory. These 6v to 12v inverters are advertised in Hemmings, found at Radio Shack and do show up at flea markets and swap meets.. The 6v to 12v inverters that Radio Shack made will take 6v - or + ground and allow 12v positive ground accessory's to be used. They are inexpensive and probably not more than $20. You can keep both the inverter and the accessory in the glove compartment — out of sight.
The bottom line is: When you have a good battery with sufficient cold cranking amps, a #2 wire (available from NAPA, Hemmings or on eBay) going from battery to starter ( NOT #4 as is used today ), a calibrated carb and the timing set properly, there is no reason to do any conversion. Also, for hot starting problems, Packard recommended: When starting after the engine is hot, don't depress the gas pedal.12v - ground Accessory in 12v + ground Packard
With regard to the car being positive ground and you want to install 12v negative ground accessory — usually automotive accessories have one wire coming out, making that unit's case the ground terminal.
What you may need to do is to attach a wire to that unit's metal case, making it a two-wire accessory. Then, when installing it in the car, attach the unit in such a way that it does not contact the car's body. This can be done in any number of ways, usually involving a fiberglass or wood panel or by hiding the 12v accessory in the car's Glove Compartment. Then you can attach the unit's positive wire to the car's ground, and the negative wire to the accessory post of the ignition switch.'Old Timer' Compression Test
Perhaps this is an old trick that everybody knows, but I thought it was useful to add to the Tips.
Get a 10mm fuel pump fitting (high Pressure) off a junk Volvo and weld it to an air hose type fitting that will also fit your compression gauge. This will allow a "cyl leak test" on each cylinder by hooking an air hose to the cylinder.
Here are the steps to follow:- You put the cylinder you want to test at top dead center.
- Screw the fitting into the spark pug hole.
- Apply air pressure to do the "4 hiss test":
- listen at the tail pipe - for leaking exhaust valve;
- listen at the carburetor - for leaking intake valve;
- listen in the radiator - for leaking head gasket; and
- listen in the oil filler cap- for leaking ring blow by.

